Master the Art of Growing Roses from Seed: Tips & Tricks
Have you ever dreamed of growing roses from seed? While learning how to grow roses may seem a daunting task, with the right knowledge and techniques, anyone can do it!
In this article, we’ll cover everything you need to know to start to grow beautiful roses – from understanding rose seeds and rose hips to planting and nurturing your rose seedlings. We’ll also address common challenges that arise during the process and give tips on how to overcome them. So let’s get started!
Understanding Rose Seeds and Rose Hips
What are Rose Seeds?
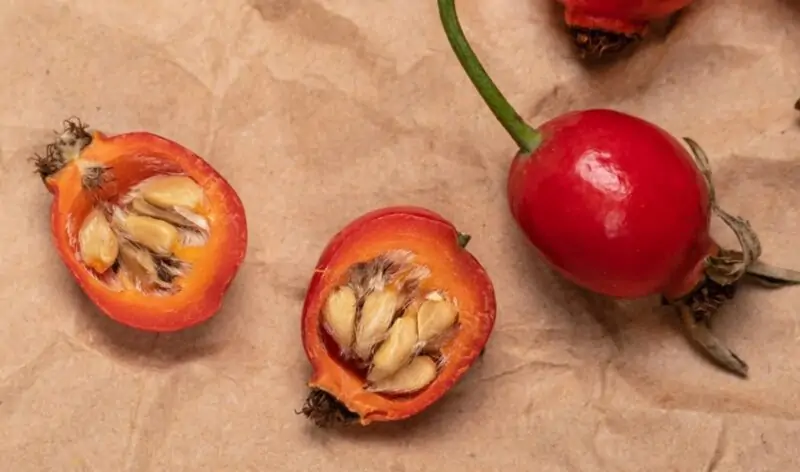
Rose seeds are small brown or black pods found inside a mature rose hip. There are several tiny seeds inside each pod: all of them can be used for propagation.
Getting the Seeds and Storing Them
The best time to harvest rose hips is in late fall after they have turned bright red or orange. Simply cut off the ripe hips with pruning shears or scissors. Once harvested, remove any remaining stem pieces attached to each hip before storing the hips in an envelope or container labeled with the rose variety name. Do not mix seeds from different varieties of rose up!
Keep them at room temperature until ready for stratification (the process needed for germination).
Stratification & Germination of Rose Plant
How To Cold Stratify the Seeds?
Stratification is exposing your dormant seeds to cold temperatures, which helps break their dormancy cycle, allowing them to sprout when planted later in warm soil conditions.
Now you need to remove the seeds from the rose hips. Place The ripened rose hip on a board and cut open the rose hip. Remove the pulp from the collected seeds and place them in a container. Use diluted bleach (water + 2 tsp of household bleach) to make sure the seeds are free from fungus spores and dangerous bacteria. Stir the seeds, then rinse them using bottled water.
There are several ways to stratify your seeds. First, you can place your seeds on a paper towel. Soak the seeds and the towel (use a mixture of equal quantities of peroxide and purified water) to prevent mold from growing. Place the seeds and moist paper towel into a plastic bag and put it in the fridge. Don’t forget to write down the date when you placed the seeds in the fridge, so that they did not stay there for too long (there is always a risk that the seeds will germinate while still in the fridge). Set the temperature to 1-3 degrees Celsius (33-37 degrees Fahrenheit).
It is important that your seeds be surrounded by damp paper towel for the entire period of stratification (6-10 weeks): cold moist storage is exactly what they need. Check occasionally to see if the towel needs remoistening.
There is also another way to stratify the seeds. Put some moist vermiculite into plastic bags; then add 10-20% hydrogen peroxide solution by volume, ensuring enough moisture is available throughout all layers. This will kill fungi spores present within the medium substrates while keeping contents damp. Place these bags into the fridge.
Last but not least, you can plant the seeds in a tray of potting mix and place the entire tray in the fridge. Warp the tray in a plastic bag to keep it moist.
Germinating Your Roses Seed For Successful Planting
After the cold treatment period has ended, check daily until successful emergence occurs, ensuring a constant environment, even watering schedule, light intensity, and nutrients are ideal.
Planting and Nurturing Your Rose Seedlings
Preparing the Soil & Planting Rose Seeds
Once your seeds have successfully germinated, it’s time to plant them in the soil. Remember that rose seedlings need moist, well-draining soil with a pH of 6.0-7.0. You can also use peat moss for growing rose bushes from seed.
Fill trays or pots with potting mix up to ½ inch deep (1 cm) below the rim, then sow one seed per compartment, pressing lightly into the medium substrate and covering completely.
Caring for Your Rose Seedlings: Watering, Feeding & Transplanting
Water regularly, keeping the top few inches of soil damp at all times; fertilize once every two weeks using water-soluble fertilizer diluted according to package directions until plants start growing true leaves.
Transplant young plants outdoors only after the danger of frost has passed, ensuring enough space between each plant (minimum distance should be around 18 inches apart) based on your garden bed or border spacing requirements.
Growing Roses from Seed – Common Challenges and Solutions
Factors Affecting Germination
Some factors affecting successful germination include temperature fluctuations during the stratification period, improper storage conditions prior to sowing, inadequate light exposure post-emergence, and weak, leggy growth habits.
Tips for Overcoming Common Issues When Growing Roses From Seeds
If you’re having issues getting good yield results, try starting more than one variety or cultivar type in the same batch to ensure multiple successes. You can also try planting cuttings taken from existing rose bushes or using a rooting hormone to increase the chances of success.
Propagating & Best Way to Grow Roses
How To Propagate Roses From Cuttings
To propagate through stem cutting, take a 6-8 inch long clipping with several leaves intact. Remove any flower buds and dip the end in rooting hormone before placing it into well-draining soil. Water thoroughly and cover with plastic wrap to create humidity until roots have formed (usually within four weeks).
Creating A Beautiful And Diverse Rose Garden

When expanding your garden, keep in mind that roses come in many different colors, growth habits, scents, and petal shapes/sizes depending on the cultivars chosen. Be creative when selecting them and mix and match them for an interesting and visually appealing effect!
FAQs about How to Plant the Rose Seeds
It can take up to two years before your rose will produce flowers after germination.
Yes! You can absolutely grow roses directly from seeds without needing bulbs at all.
No! As long as you provide the correct conditions during the stratification period, followed by proper watering, light exposure, fertilization schedule, and transplanting procedures, anyone can achieve great results just like an experienced gardener would expect!
Yes! Peonies are typically propagated via root division. However, some varieties occasionally produce viable hybrid offspring. These hybrids can be grown out for further selective breeding programs and crosses between parents. This helps ensure desirable traits are inherited in successive generations.
Follow the same instructions used for planting in trays, except use individual pots instead of multiple compartments within a larger container.
Yes! Rose hips contain the seeds needed for propagation. Simply collect them in late fall, then follow our instructions above!
Start the stratification process around New Year’s Day and continue until early spring when the danger of frost has passed; this will ensure that your seedlings are ready to transplant outside by mid-summer at the latest.
Harvest ripe hips after they have turned bright red or orange, using sharp scissors or pruning shears to clip off the stem close to the base below the fruit body. Remove any remaining debris attached and store in envelopes labeled with the variety name. Keep them at room temperature until they are used for cold treatment, followed by successful emergence and transplants.
Conclusion
Growing roses from seed may seem challenging, but with proper knowledge, techniques, and patience, anyone can achieve great results just like an experienced gardener would expect! We hope this guide has been helpful in getting started on your journey towards creating a beautiful and unique garden filled with colorful blooms year-round.
Remember to always provide the right environment, adequate light exposure, sufficient water supply, and nutrient schedule to support healthy growth patterns and maximize your chances of success along the way. Don’t be afraid to try new things and experiment to see what works best for your individual situation based on your geographic location, climate, and preferences.